When it comes to wardrobes, the visual differences on the market may seem minimal at first glance. However, there are many subtle details and variations that can make a big difference. Choosing the right custom furniture is an essential part of home decoration, and understanding how to do it properly can save you time, money, and frustration in the long run. Here are some practical tips to help you make better decisions when purchasing custom furniture.
Determine the Style Based on Room Size
The size of your living space plays a crucial role in selecting the right custom furniture. If your room is small, it's best to go for space-saving designs. For example, choose simple shapes for wardrobes and cabinets, keeping their volume as compact as possible. Focus on maximizing storage while avoiding overcrowding. This not only improves the aesthetics of your space but also makes it more functional.
Ensure Consistency with Your Interior Design
One common mistake people make is choosing furniture that doesn’t match the overall style of their home. Before starting any renovation, decide on the style you want—whether modern, traditional, or minimalist—and ensure that all custom pieces align with that vision. A Chinese-style wardrobe in a contemporary setting, or a Western-style sofa in a traditional room, can look out of place and disrupt the harmony of your space.
Focus on Practicality and Functionality
Many consumers get caught up in the looks of furniture in showrooms, only to find that it doesn’t fit well at home. It’s important to consider real-life usage. Think about how you actually live in your space and what functions the furniture needs to serve. Don’t just follow trends or magazine ideas—make sure your choices are both beautiful and useful. Avoid over-designing or adding unnecessary features that don’t contribute to your daily life.
Avoid Unnecessary Waste
Custom furniture is often chosen for its uniqueness and personal touch, but it should also be cost-effective. Avoid spending extra on fancy designs that don’t add value. If your budget is tight, focus on practical, high-quality pieces rather than overcomplicating things. Remember, the goal is to create a personalized space without wasting money on features you won’t use.
Maintenance Tips for Custom Furniture
Customized furniture offers great flexibility in using space and expressing individuality. However, proper care is essential to maintain its appearance and longevity. Start by assessing the number of family members and their needs. If your space is limited but you have a larger household, prioritize multifunctional and space-efficient designs. Plan ahead for different types of clothing and storage requirements to avoid future issues.
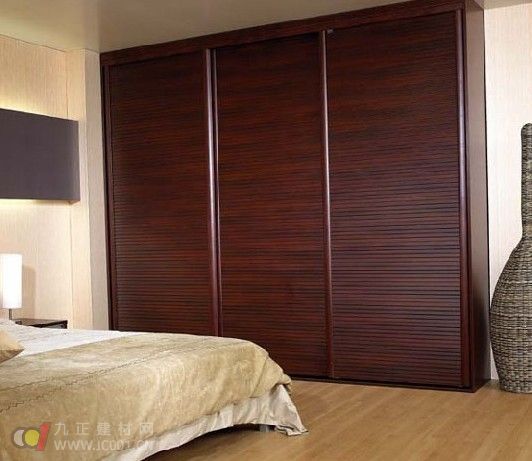
When selecting a custom wardrobe, always consider your home’s layout and existing decor. A wardrobe that looks perfect in a showroom might not fit well in your actual space. Also, ensure the style matches your interior design. It’s wise to finalize your furniture style before beginning any renovation work.
For maintenance, regularly dust the surface with a soft cloth. If there are stains, gently sand them off. Wipe hardware with a dry cloth—avoid chemical cleaners or acidic solutions. If you notice black spots, a little kerosene can help remove them. Be careful not to scratch the surface. If minor scratches occur, mix lemon juice with ash, let it dry, and then apply wax to restore the finish.
Check the joints periodically and tighten them if needed. Apply a small amount of lubricant to keep moving parts smooth. When cleaning, use a slightly damp cloth to wipe cabinets and doors—never use harsh detergents. Clean the tracks with a vacuum or small brush, and wipe metal parts like frames and rods with a dry cloth. Proper care will ensure your custom furniture lasts longer and continues to enhance your home.
Solar Mounting System For Green House
The Installation of Mounting Unit
1. Make the concrete base according to solution drawing, locate embedded bolts and set out strings by Laser Level to ensure the centers of embedded bolts in the same elevation as accurate as possible on vertical, horizontal direction and at end face.
2. Locate the Anchor Plate on the concrete base and adjust the position according to solution drawing(remove M14 washer,M14 spring washer,and M14 nut if they are connected to embedded bolts now),and then fasten M14 washer, M14 spring washer, and M14 nut with the tightening torque of 60N.m.
3.Take out the Hexagon Bolt Kit with Post B Corrugated Gasket M12x95 and remove its nut, spring washer, one washer, and corrugated gasket. Insert the Post A, B, C in to Anchor Plate according to the Hexagon Bolt Kit with Corrugated Gasket M12x95 drawing and then fix them by two sets of Hexagon Bolt Kit with Corrugated Gasket M12*95. Post C Post A
4.Remove the bolt kits M12*90 from all the Posts and Pre-Assembled Supports and unfold the embedded Supports, fasten them on the Posts by bolt kits M12*90 according to the drawing.
Installation of Rails
1.Please check the length of Beam before place it onto the Pre-Assembled Supports, otherwise extend it with Splice forBeam first. There are 4 self-tapping screws in each side and total 8 self- tapping screws in both sides. We strongly recommend NOT extend the Beams on Preassembled Supports.
2.Before locate the Beams, mark the position of the Beam son the surface of Pre-Assembled Supports with maker pens according to solution drawing for easier installation. Place the Beams on the 55*80 Tube of Pre-Assembled Supports and fix it with C Clamp Kits. Install all the Beams in the same step. The tightening torque will be 20N.m. C Clamp Kit Side Beam(Please arrange 3-4 persons to install when the array is long.)
Installation of Solar Panels
1.Place the panels above the Beam 85, fixing it with Wide End Clamp Kit in the side and Inter Clamp Kit in the middle. Install all the panels in the same steps until complete installation of al panels. Fasten all the bolts with tightening torque of 10N.m.
2.Complete installation, and please inspect and make sure all the bolts are fastened.
Solar Panel Mounting Frames,Solar Panel Mounting Systems,Greenhouse Solar Mounting System,PV Mounting Systems
Hebei Honde Plastic & Metal Co., Ltd. , https://www.foundation-system.com